Tuesday, July 2, 2019

Creating a Pages Template

It is very common for teachers to distribute templates to students for assignments.

A paper worksheet is a learning template, but it limits the content to what can be written with a pencil.  Digital templates create flexibility and allow students to demonstrate learning with a much greater depth of knowledge.

Take a picture and mark it up,  record a voiceover, add a video, add an animation, and more.  Let your students be collaborative and creative.


Pages can function like a traditional word processor.  Just keep typing and the text will flow onto the next screen.  This doesn't work well when we try to have a template created with multiple pages.  For that we actually want a 'page layout' format.  The structure is then built for students to add their different elements.

Here is a quick way to check to see if the template you are using will let you quickly add more pages for your learning template using Pages:


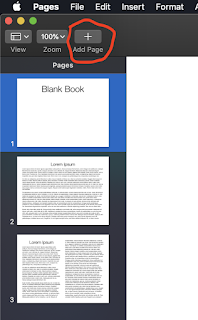
To use the Page Layout format in Pages, start here:


These directions are shown using MacOS (laptop).  It is best to do this before adding content to the document.
If your Pages document is set up as a word processor, 'Add Page' will be grayed out.  To add pages just keep typing more text OR insert two page breaks in a row.


We want to have better learning templates for students than a blank screen with text typed in.  That's not really a learning template.  It also does not support students very well who are still learning how to create multimedia rich products.  A blank screen does not support that very well.
In the upper right corner of your screen, click on Document.  Make sure Document Body is NOT selected when you want to use the Page Layout format.


Page Layout is nice when you want to use a template with fixed elements, such as a magazine or newsletter, where the text is all located in text boxes.  This is also easier when you want the option to be able to rearrange pages or add additional pages in the middle of a document.


To read more about this and other editing features in Pages, click on this link.
Monday, July 1, 2019

Timing Your Email

New to your Gmail account:

You can time when you want an email sent from your school or personal Gmail account.

At one time, I would regularly type up emails and leave them in my Drafts folder until I was ready to send, usually right away in the morning.  Often it was because I was doing my typing well after business hours.  

Pick the time/day/year that you would like to send....
     - a thoughtful birthday wish
     - an important meeting note
     - a note to a colleague about an upcoming event
     - you can even send an email to yourself, but delayed

Open a new Gmail message and enter at least one recipient.  Type up whatever you want to send out.
Click on the down arrow next to your Send button


Set the schedule as you wish.

Pick the time, day, and year.  Yes, you can choose the year.  It will work as long as your email account is active.  


This feature was only available through an email add-on.  That's not needed any more.
You can change your mind, too, and cancel that scheduled message at any time.  However, once it's sent, there's no bringing it back.  We can't unstrike that match.

Send me a note if there is a special feature that we should be highlighting for everyone to use.  I'll add it to my blog on another post.