Wednesday, April 28, 2021

Student Voice - Let's Hear What You Have to Say

 Adding Student Voice to Google Classroom with a Voice Memo with iPad:

This is a really quick way to use add audio to a class assignment.


Open the Voice Memo App and record your message.

There are some basic editing features available in the app. 
It is best to have a script or outline written out ahead of time, before beginning the recording.


Once ready, export the file to your iCloud account in the  Files App.
(This will be saved in a .mp4 format) 


Save the file to either your iCloud Drive OR directly to your iPad.

If you are not fully signed in to your iCloud Drive then select On My iPad.


_____________________________________________

Now, let's add the file to your Google Classroom assignment.
     1. Open up Safari,
     2. Go to your Google Classroom class assignment, and
     3. Add the audio file.   


   4.  Select Browse -> Browse -> navigate to your audio file in iCloud OR on the iPad.
            These are both located in the Files app on the iPad.


Select the correct location (see directions above)


5.  Tap once on the file to select it.


Once uploaded to Google Classroom, it will look similar to this on your screen:


Note:  If you need advanced tools for a more complex activity, such as a podcast, you may want to consider using GarageBand instead of Voice Memos.

Wednesday, April 21, 2021

Take it Easy on Your Eyes

 We can adjust settings on our devices that can be easier on our eyes, and in turn, our brains.  This is especially important where a bright screen can be a problem for a user, whether it is follows and injury, such as a concussion, or where extended use is required.

Here are some options that you may want to consider trying out.
These settings may affect some apps differently.

On iPad, tap on the Settings app.  On laptop, click on the System Preferences app.


On iPad

Open
(1)Settings->(2)Display & Brightness

(3) Dark Mode will switch the light background and black text we are used to in our Apple apps to a white on black arrangement.

(4) True Tone will make automatic adjustments based on the lighting around you,  making the screen either more bright or dim.

(5) Night Shift gives the brighter colors on your screen a yellow tint, in a similar way that we purchase light bulbs that have either a 'warm' tint or a bright white tint.
(1)Settings -> (2)Accessibility -> Display & Text Size

(3)Reduce White Point will dim the brightness of only your bright colors without changing  your darker colors.  For black, there will  be no difference.

At the top of the screen, Larger Text could be turned on, as well.


On  Mac (laptop)

System Preferences ->  General

 Dark Mode will switch the light background and black text we are used to in our Apple apps to a white on black arrangement.
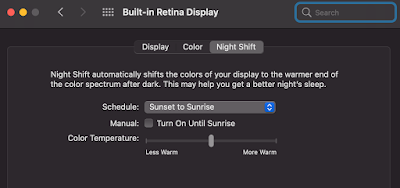
System Preferences -> Displays -> Night Shift

Night Shift gives the brighter colors on your screen a yellow tint, in a similar way that we purchase light bulbs that have either a 'warm' tint or a bright white tint.
ccdd