Friday, July 2, 2021

Google 2-Factor Authentication

 2-Factor Authentication is a fancy term for requiring 2 methods to log into an account.

First is a password - On many devices, this can be auto-filled or saved.  

Second is often either a text message by phone or an alert that pops up on a different device.  I usually use the text message feature. 

Our district has turned on the option for you to turn on 2-Factor Authentication for your school Google account to improve the security of your work data.  You can turn on this feature from either school laptop or iPad that you are already signed into.


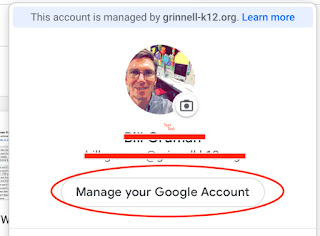
Log into your Google account
Click on 'Manage your Account'

Select Security


Next


These are the additional devices that  I am signed into.  Your screen may look a little different


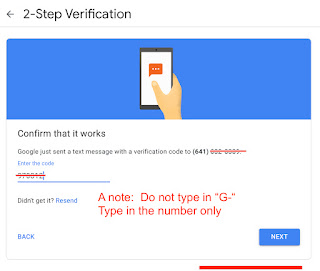
Send a text message to your phone for the initial setup


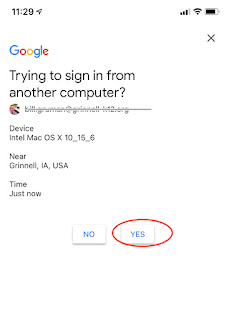
This is what it looked like on my phone


Type in the code that popped up on your phone.


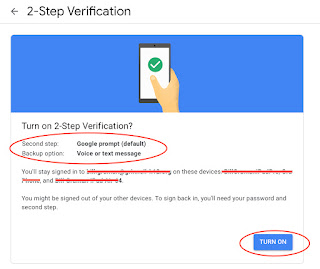
Verify your settings


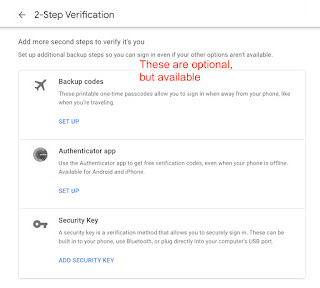
You can select an additional backup method if you would like. 

This can ALSO be done with the Google Authenticator App, which is available on your school-issued iPad, downloadable in Self Service
So now, when I sign in to my Google account on my laptop or iPad, this will pop up on my phone.

This provides and extra layer of security for me and all the professional resources that I am a caretaker for.


Wednesday, May 19, 2021

iPad Split Screen File Transfer

We can use splitscreen on iPad to transfer or move files from one application to another.
We will often have a request wondering how to quickly move pictures from iPad to Google Drive.


For the example below, I used splitscreen on my iPad to move some pictures in my Photos app to my Google Drive.


1.  Open Photos
2.  Open Safari, but in splitscreen mode.  Navigate to your Google Drive folder.

See video below for reference: 


3. Tap and drag photos from the left side of your screen to the right  side.

See video below for your reference:


__________________________________________________

Here are the tech directions that were emailed out to students on May 6th:

GMS Students-

ALL iPads will be wiped this summer so as you prepare for device and charger turn-in on May 26 (5th&6th) and May 27 (7th&8th) please follow the below instructions to ensure the data you wish to save (that is stored on your current device) is backed up. Please note anything already saved in Google (Email, drive, docs, sheets, etc.) will be accessible next year when you log back into your school email. If you want to save any additional files, downloads, photos, etc. you MUST follow the directions below. Please also note that you can select multiple files at the same time but if they are larger (like photos) be prepared for it to take some time for the upload to complete. While the selected file is uploading your iPad needs to remain open and connected to wifi. 

Saving Files on Google Drive:
Step 1: Log into your @grinnell-k12.org email using a Safari browser.
Step 2: Tap on the App Launcher (see Step 2 in the photo below).
Step 3: Tap on Drive to open your Google Drive (see Step 3 in the photo below).


Step 4: To make it easier to find items you may want to create folder(s) in Drive first, so you can easily group the files you drag in.

To Add a Folder:
On the left side, under the word Drive, tap New, then tap Folder, then name the folder, then tap Create.

To Upload Files: 
1. To make this easier you may need to split the screen between Safari browser and Files App or Photos so you can see your browser and the app at the same time to drag items into Drive.
2. Open Files App or Photos and simply tap  on the file(s) you want to save and drag it into the folder you created in Drive or drag anywhere in Drive and in the bottom right corner it will show the upload process. 


Tuesday, May 4, 2021

Where Did My Air Play Go?

 If you recently updated your laptop MacOS to Big Sur and you are trying to connect to your Apple TV, you may have discovered that the workflow has changed.

Here is where you can find Air Play on your updated laptop:


System Preferences -> Displays -> Display

Check the box in the lower left corner. Then click on the drop-down to find your Apple TV


OR (easier)


Click on the Control Center icon in the upper right corner.   Select  Screen Mirroring.

Now, select the Apple TV of  your choice.


Click Here to learn more about Air Play with Big Sur

Wednesday, April 28, 2021

Student Voice - Let's Hear What You Have to Say

 Adding Student Voice to Google Classroom with a Voice Memo with iPad:

This is a really quick way to use add audio to a class assignment.


Open the Voice Memo App and record your message.

There are some basic editing features available in the app. 
It is best to have a script or outline written out ahead of time, before beginning the recording.


Once ready, export the file to your iCloud account in the  Files App.
(This will be saved in a .mp4 format) 


Save the file to either your iCloud Drive OR directly to your iPad.

If you are not fully signed in to your iCloud Drive then select On My iPad.


_____________________________________________

Now, let's add the file to your Google Classroom assignment.
     1. Open up Safari,
     2. Go to your Google Classroom class assignment, and
     3. Add the audio file.   


   4.  Select Browse -> Browse -> navigate to your audio file in iCloud OR on the iPad.
            These are both located in the Files app on the iPad.


Select the correct location (see directions above)


5.  Tap once on the file to select it.


Once uploaded to Google Classroom, it will look similar to this on your screen:


Note:  If you need advanced tools for a more complex activity, such as a podcast, you may want to consider using GarageBand instead of Voice Memos.

Wednesday, April 21, 2021

Take it Easy on Your Eyes

 We can adjust settings on our devices that can be easier on our eyes, and in turn, our brains.  This is especially important where a bright screen can be a problem for a user, whether it is follows and injury, such as a concussion, or where extended use is required.

Here are some options that you may want to consider trying out.
These settings may affect some apps differently.

On iPad, tap on the Settings app.  On laptop, click on the System Preferences app.


On iPad

Open
(1)Settings->(2)Display & Brightness

(3) Dark Mode will switch the light background and black text we are used to in our Apple apps to a white on black arrangement.

(4) True Tone will make automatic adjustments based on the lighting around you,  making the screen either more bright or dim.

(5) Night Shift gives the brighter colors on your screen a yellow tint, in a similar way that we purchase light bulbs that have either a 'warm' tint or a bright white tint.
(1)Settings -> (2)Accessibility -> Display & Text Size

(3)Reduce White Point will dim the brightness of only your bright colors without changing  your darker colors.  For black, there will  be no difference.

At the top of the screen, Larger Text could be turned on, as well.


On  Mac (laptop)

System Preferences ->  General

 Dark Mode will switch the light background and black text we are used to in our Apple apps to a white on black arrangement.
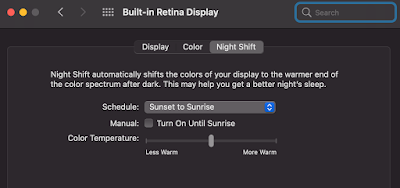
System Preferences -> Displays -> Night Shift

Night Shift gives the brighter colors on your screen a yellow tint, in a similar way that we purchase light bulbs that have either a 'warm' tint or a bright white tint.
ccdd

Thursday, March 25, 2021

Video Streaming for all Learners


There are several video streaming services available for teachers.  Each of these are free for teachers to create instructional videos.  There will be many enduring changes as we transition back to our normal routines, but I expect that the increased use of  video in instruction will continue.

Vidyard
This video streaming service is very similar to Loom, and is relatively new.  A free account  should cover  most classroom needs for teacher-created videos.  Unlike YouTube, it is not social media and is not advertisement-based.

Screen recording is done directly through their website instead of an app  at vidyard.com or through their Chrome extension.

Vidyard does have a feature though that Loom does not:  a  teacher can upload any video to their dashboard to share with students.    

Vidyard does have an iPad/iPhone App, but it is quite primitive.  For iPad use, I would recommend recording on the iPad and then transferring to laptop to upload.

Like Loom, there is an option to have videos be publicly searchable, which I do not recommend.  

Click here to get started with a free account.


Threadit
This is a new streaming service offered by  Google that is like a cross between Flipgrid, Loom, and Google Docs.  More on this will be posted soon.


YouTube

YouTube is built as a social media platform and should be either avoided or only used with close monitoring by an adult with younger learners.  Even for older learners, it should be done with care since much of it is advertisement-based.

There are some proxy shortcuts available to hide advertisements, such as Quietube and View Pure, which I have used for many years. I would recommend against using video.link because it is not very user-friendly.

All staff and most students have YouTube channels where they can either upload and share original content or build playlists of content that others have created.


Loom
We have many teachers across the district using Loom to build screencasting lessons.  Teachers use either the iPad app or  laptop app to do the recording,  which uploads directly to a 'cloud' streaming service.

This service was getting caught by our district's web filter when students tried to view videos on iPad, but that is not longer an issue.  It is widely used across the grade levels and easily accessible.  

Screencastify
Screencastify is limited to short videos on laptop through its Chrome extension.   It will do everything that Loom will do, but in a more limited fashion.  

Microsoft  Stream

All of  our students and staff have  Microsoft  accounts,  which gives them access to using Microsoft Stream.  It is easy to manage.  Videos may be uploaded  to a dashboard, where they  can  quickly be organized into  folders, or playlists.  However, unlike other services listed here, viewers do have to be  signed in, which has been a barrier to its widespread adoption.

Zoom

This is a video-conference tool, but for some upgraded  accounts, can save and stream recorded  meetings.

_____________________

Videvo
This streaming service offers free downloadable content that students can use in projects.  Some videos require and attribution, which can be easily added  to any production.  Our staff and students  cannot post here, but they can  certainly download audio and video to be able to use on projects for the services above.

Creative CommonsYouTube Audio Library,  and many other resources are available to download content for use, but with the correct attribution permissions.


Clips
On iPad, I would recommend  using the Clips app for quick and easy video building for either students or teachers.  The final product can be 'Shared' out to upload to any of the applications  above.

For more detailed work, iMovie for iPad or laptop  would be the way to go.


Monday, March 8, 2021

Sharing Files with ClassLink - Audio

  Students:  

These directions show how to download and open a file that a teacher shares with you  on ClassLink.
These directions are for iPad only.

Sign in to your ClassLink account.


Grades K-4 can use a Quickcard.
Grades 3-12 can use their school Google account.
Tap on the 3 lines in the upper left  corner.
Tap on My Files 
Tap on ClassLink Drive
Tap on Shared

We want  to download and open a file that your teacher has shared with you. 
Tap on  your teacher's shared Class Folder


Friday, February 26, 2021

Student Privacy with Digital Resources

Maintaining student privacy is a must with our digital learning resources.  Working in a 1:1 environment, where every student is issued a school device, we can avoid 'shared' classes, where privacy can be compromised.

Our students frequently use online digital resources such as Seesaw, Freckle, Google Classroom, and EPIC.   Each of these resource allows the ability students to use a 'Class Code'.   Below, I have a little description of how a class code is used with each.

Depending on the resource, it can be a significant privacy breach if students can easily log in to their peers' accounts.  It is often best practice to avoid using a 'class code' for student accounts. 

Freckle

Classes and rosters are synced daily with Infinite Campus.  It is permissible for a teacher to manually build their own 'class' with rostered students, but not necessary.

A Class Code is available for a teacher-created class.  All students can log into their account using  ClassLink, making the class code unnecessary.  Freckle does not allow a teacher to reset a Class Code.  Once a Class Code has been compromised, there is no other  alternative than to delete the class.  

 If a teacher-created class is deleted, it will not affect student accounts or their work.  For our District, the Class Code never needs to be shared out.  Freckle is available through ClassLink with no separate sign-in necessary.  It is recommended to use use ClassLink instead of the website or application.

If a Class Code was shared out, it is recommended to remove, or delete, that class.   As long as the students listed somewhere in one of the "Managed by ClassLink" classes, no student data will be deleted.  It is permissible for a teacher to create a class in Freckle, but the Class Code should not be shared out.


Seesaw

 For our District, in the Class  Settings,  the Student sign in mode should always be set to '1:1 Devices'.  If it is set to 'Shared  Devices', it should be changed right away.  However, doing so will require students in that class to sign back in.

For younger students, Home Learning Codes are available to sign in through the Seesaw iPad App.  Older students may either use the Home Learning Code OR their school Google credentials to log in.


Beginning with the  21-22 school year, Seesaw classes and accounts will be synced with our student information system, Infinite Campus.   It will be available then through ClassLink, so no separate sign-in will be necessary.  

Google Classroom

Google Classroom is a basic learning management system.  Here, the Class Code is for enrollment purposes only.  It does not impact students' privacy.  Their login is with  a unique username and  password.

Google Classroom is age appropriate for middle and  high school students, and at an introductory level for third and fourth grade students, where they are first introduced to using email. 


EPIC     

This is a popular digital ELA resource for our younger learners.  The free version only only allows for a shared Class Code.  Students and teachers can log in on the website at this link or use the iPad App.

EPIC School can only be used between 7:00am and 4:00pm, and presumes that there will be some level of adult supervision.  

With the Class Code,  any student 'can'  log  in as any other student, so good supervision is a must.

Without good supervision, it would be best to avoid using this resource.

__________________

Advertisements and In-App Purchases are generally a deal-breaker for selecting digital resources.    It is  best practice to avoid apps that have these.  Also, because we need to be compliant by COPPA, FERPA, and SOPIPA, we need to check to resources' privacy policy for a statement that explicitly states that account data will not be shared with outside third parties.


Thursday, February 11, 2021

For Teachers: Sharing Files using ClassLink

 Teachers have several ways  to quickly share files to  student iPads  that  can be downloaded  and opened.

This can include using Air Drop,  Google Drive, or iCloud.   However, for younger learners this can be a difficult workflow and a barrier to learning.  Below are directions to setting up a shared folder for your students using ClassLink, as another option.   Please let me  know as you  would like to learn  more.   

Click here to view Student Directions.  I would strongly recommend signing in as a student on your  iPad to go through their workflow, once you are set up here.

_________________________

The directions below are for a Teacher sharing files in a Shared Folder from their laptop.

Visit launchpad.classlink.com  and sign in to your teacher account with your Google credentials.


Click on the 3 lines in the upper left  corner of your screen and select My Files.

OR

Click on the My Files icon at the very  bottom of the screen.


Click on the Shared folder.

From here, you can create  a folder to share with students.  All files in this folder may be opened or downloaded by students.

These are not collaborative files, meaning that everyone  will have their own  copy.

IF  Your Shared Class  Folder has already been created, you may skip this step.


Once you are 'in' the folder, you can either drag-and-drop in files 

OR
   
Select Upload Files at  the top of your screen

Right-click  on the folder to add students or other teachers.

Students will normally have  Read-Only access.
Teachers will normally have Full Access.
See screenshot below.


Here is an example of what My Files may look like for a teacher.


Tuesday, February 9, 2021

For Students: Sharing Files with ClassLink

 Students:  

These directions show how to download and open a file that a teacher shares with you  on ClassLink.
These directions are for iPad only.

Sign in to your ClassLink account.


Grades K-4 can use a Quickcard.
Grades 3-12 can use their school Google account.
Tap on the 3 lines in the upper left  corner.
Tap on My Files 
Tap on ClassLink Drive
Tap on Shared

We want  to download and open a file that your teacher has shared with you. 
Tap on  your teacher's shared Class Folder


1. Tap on the file  name to open in Preview mode

2.  Tap on the ... in the upper right corner

3.  Select  Open  In  ..... Keynote


OR

1. Tap on the ⌄ symbol in the upper right corner.

2. Tap on  Open In .... Keynote
Choose Keynote,
        or whatever appropriate app is needed.
An extra tip -

When using Keynote, tap on Edit to make changes to the slides.   

You only need to  go  through these steps once.   
If you  repeat them you will get  another new copy. 


__________________________

Here is a map of all of the steps shown  above: