Monday, December 30, 2019

Google Applications for iPad

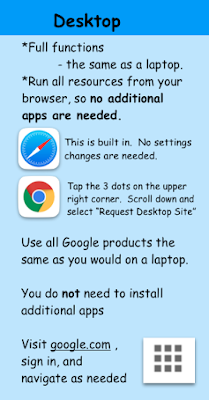
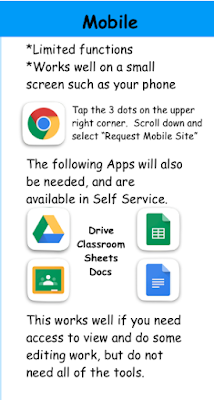
There are 2 different options for using Google products on your iPad: Desktop and Mobile

My recommendation for using Google Applications on teacher and student iPads:  Use Safari only.
(I would recommend to not install Chrome, Classroom, Drive, Docs, Sheets, or Slides.  They are not full desktop versions and have limited features.  Safari is a full desktop browser.) 

I do recommend using Gmail, Google Maps, Google Earth, and Google Photos, if you think you might need them.
_____________________________________

Google has a lot of room to make improvements in its iPad applications.   They do make for very easy collaboration and ease of use and are widely used. 

Most of us would prefer the user experience on an iPad that we are used to on a laptop.  We want to have all of the editing features available in Google Docs, Sheets, Slides, Forms, and Classroom.

You can have the same workflow on an iPad IF you do not install any other Google applications

IF you install other applications, such as Docs, your iPad will default to open items in that App.  So what's wrong with that?  The Docs app only has a part of the tools that are available from your web browser.  You will notice significant limitations in editing.

I prefer to use Safari since it is a full desktop web browser, but Chrome can work, too.  Either of them will 'save' your bookmarks.  They can also 'remember' your passwords, too.


IF you do not need to do much editing or formatting with your Google resources, then go ahead and use their apps.

Just keep in mind that Google only has limited editing tools available through their apps on the iPad.  See above for details about having full access to all of the editing features.

These applications are easy to use and are quick to download through Self Service.  I have Chrome listed here, but you really won't need it or Safari if you have the apps all installed.

Once you are logged in to any Google application, the iPad will 'remember' your account when you log into any others.


Here is what the menu drop-down looks like in Chrome.
You will need to scroll down a little to get to 'Request Desktop Site'


Thursday, December 19, 2019

iPad Pop-ups in Safari or Chrome

Pop-ups can either be a big nuisance or very helpful, depending on what you are working on.
By default, they are turned OFF in the Settings on your iPad.

There are times on your iPad where it is important to be able to allow pop-ups.
 Here is quick how-to to turn them on/off on either of your web browsers.

Safari for iPad directions:

On your iPad, navigate to

Settings -> Safari -> Block Pop-Ups

Turn this OFF to allow popups on your.
Pop-ups are necessary for some websites.

This will look just a little different than on a laptop.  'Pop-ups' will open as an additional tab in your browser.


Chrome for iPad directions:

Tap on the 3 dots in the upper right of your screen.  Select Settings.

Tap on Content Settings
Turn Block Pop-ups on or off as desired.


If you scroll to the bottom of this blog page, you can search for other posts related to iPad use.  Just type 'iPad' into the Search bar.

Please let me know if you have questions that I could answer with other useful posts.

Monday, November 18, 2019

Apple Pages templates

The Pages application on your iPad or laptop has incredible flexibility for student work.

There are many templates available to begin projects. 
There are 2 main types of document templates.

On your iPad,

Would you like the project to be more like a magazine, with independent text boxes, images, and other media?

OR

Would you like the project to be more like a book, with text flowing from one page to the next?


In a Pages document, tap on the 3 dots in the upper right corner of your screen.
Check the Document Body toggle.

Turn this off to function more like a magazine.  You can add, rearrange, and copy/paste full pages with this setting.


Turn this on to function more like a book.  This works better when you have a long, single thread of text, such as a long story or report. 

Monday, November 4, 2019

Mathigon - online math manipulative


Manipulatives are an important part of learning math concepts.

Online resources can work well, but are often filled with click-bait ads.  They also tend to work well in an iPad environment or laptop, but not really in both.

Here is a resource that you may want to consider using.  It's simple to work with, can be paired with many of your lesson activities, and works just as well on iPad as laptop.  It is free and has no advertisements.  It is called Mathigon.

Mathigon has a nice library of Activities and Courses.

The Courses component has features similar to Khan Academy, but without the audio.  They are divided out by an extensive number of categories.  Activities are a little more open-ended and may be applied to many different types of lessons.

Mathigon -> Activities -> Polypad:

Take a look at Mathigon Polypad at this link

Audience: Kinder through Algebra students.


Base 10 blocks, polygons, number bars, fraction bars and more.  

- Just drag and drop, and write out the problem.  
- Download the screen to your Photos, 
- Add student voice with Flipgrid, SeeSaw, or Clips.

Here, I used the Polypad activity with a Promethean intereactive display.

It shows 4 different ways to describe a math problem.  These were all done directly from the Mathigon website.

This worked very well.  It can be used to model the tactile nature of this manipulative for students will be completing the same activity on their iPad.


Mathigon Courses:  

Navigate to www.mathigon.com on your iPad/laptop
      OR
Download the iPad App from Self Service


Audience:  3-12 Students

-You can log in with your school Google account.

Walk through any of the course lessons.  They have a little different approach than Khan Academy lessons, but you will notice some similarities.


Try it out and let me know what you think.  It looks like it could be a very useful tool for you.

Saturday, October 12, 2019

PLTW Program Coordinator Meeting


I attended a meeting for Project Lead the Way Program Coordinators recently in Cedar Rapids.

Below are some notes from the meeting.  This link will take you to a Google Drive folder with the complete set of presentation slides from the meeting, as well as professional journal articles regarding PLTW in the K-12 classroom.  It is accessible if you have a Grinnell school account.

This link will take you to the PLTW site that has a complete overview of the changes coming up in the next couple of years.


PLTW has a very active presence in Iowa, as well as across the country.  It is a registered non-profit organization, but is considered a vendor by our District and government entities.
Teachers must receive training before teaching PLTW coursework at any level.  In our District, PLTW Launch curriculum is taught in our elementary buildings and one of the Gateway courses, Innovators and Makers, is taught in the middle school.

Teachers may receive training in one of 3 ways: online, in-person, and blended.
Coursework is routinely updated at all levels.

*For the fall of 2020, PLTW Launch will be fully aligned with all of the NGSS Standards.

Our District is one of a handful that are piloting new 3rd grade modules this school year.
All PLTW Launch curriculum works with iPad or laptop devices.

PLTW is still working on improving its login for students and may include the possibility of single sign-on capability.  They understand that this can be a barrier for our younger students.
PLTW Launch curriculum is for grades K-5.  The Gateway curriculum includes 10 different exploratory coursework for grades 6-8.

The Computer Science for Innovators and Makers is currently offered for our 8th grade students.
There are new Computer Science updates either in place or coming up at the high school level.  The CSP course is just one of them.

Two non-PLTW computer science courses are currently offered for our high school students.  
A new engineering course, Engineering Essentials, is available.  Students may choose to begin with the IED course instead, but this new EES course does not have such a high math requirement.

Either are strong courses to take ahead of the Principles of Engineering (POE) course.
Our District has received recognition as PLTW Launch Distinguished School in the last two years.
Here is an overview of all of the Project Lead the Way programs available for grades K-12.  They include strands for elementary, middle, and high school.
There are 4 Regional PLTW Summits available presented as a workshop conference. 
At each Summit, new Launch teachers may be trained.
     OR
Launch teachers may also receive their training through mentoring by a Lead Teacher
     OR
IF there is enough interest (20 teachers) and a host, a training may be offered in the area.
We had a guest from the Iowa Department of Eduction join us via teleconference.
A significant topic discussed was the changes to how Perkins V funding could be spent.  In the past it had been for high school only.  Now, it can include exploratories down to grade 5.  There are also specific requirements as to how those teachers are certified.


Sunday, October 6, 2019

Digital Resources for Math Rotations


Learning rotations are an important part of today's elementary math classroom.  Here are some digital resources that are being used in our district.  Each of these resources may be used on student iPads.
As a 1:1 school, these really should be set up with each student using their own device.

Math rotations should include more than just worksheets and more than what is listed below.  I enjoy learning about how you organize learning rotations.  What are your students doing?

What other digital resources do your students successfully use?  I would like to get more added to this list.  Please let me know if you have any questions.

These are listed in no particular order.

MobyMax

Management:  Teacher and District
Login: a unique username/password.  ClassLink works great
Interface:  website
Grades:  K-8
Click here to get signed in.

XtraMath

Management: Teacher
Login:
     Teachers will use their school Google account.
     Students will login with a first name and PIN number.  ClassLink works great.
Interface: website
Grades: K-5
Click here to get signed in.

Happy Numbers

Management: Teacher and District
Login: 
     Students will sign in with a class number.  ClassLink works great.
Interface: website
Grades:  K-2
Click here to get signed in.

Khan Mappers

Management: Teacher
Login:  Use a school Google account.  ClassLink works great.
Interface: website
Grades:  This has worked well so far for 3-4.  I haven't seen how well it works for K-2

This spinoff of Khan Academy may be customized according to each student's MAP score. 
Click here to get signed in

OSMO Numbers

Management: none
Login:  none
Interface:  iPad App, available in Self Service
Grades: K-2

This is geared more towards our K-2 learners.
Students will complete leveled math activities.  This is best done when students use their own iPad and NOT shared devices.  This is one of several OSMO apps available to all students.

I have distributed iPad stands and mirrors to all K-2 classrooms.  Let me know if you would like to request more.

Click here to learn more.

Freckle Math

Management: Teacher
Login: 
     Teachers will log in with their school Google account.
     With the App, students may log in with a class code or QR code.
     From the website,  ClassLink works great.  With it, login info only needs to be entered once.
Interface: website or iPad App
Grades: K-5

There are student activities for math, ELA, social studies, and science.
Click here to get logged in.

Prodigy Math

Management: Teacher
Login: 
     Teachers will log in with their school Google account
     Students can get started with a class code.  Click on 'new student' to enter.
     For students using the website, it is set up in ClassLink.
Interface: website or App.
Grades: 1-8

Click here to learn more.

Mathigon

Management:  Self-managed
Login:
      Users will log in using their school Google account
Interface:  website
Grades:  K-12 for Activities, 6-12 for the Courses

Click here to read my separate blog post about this resource.

We had some successful piloting work using this tool on the interactive Promethean boards in K-2 classrooms.


Thursday, August 29, 2019

Printing on specialty paper

I had a post last spring with a quick tip about how to print double-sided to our school printers... or how to turn that feature off.  Click here to check it out.  This should help reduce the paper waste that piles up in the recycling bins.
You may also want to consider this:  There have been a number of times that I have seen where paper is wasted because it is printed out on regular white paper and then photocopied onto colored paper, cardstock, or some other specialty paper.  This is a perfect place to use the Multi-Purpose Tray instead.  It's that side tray that flips down on the right side of the printer.

In the picture below, I am printing out one of the ClassLink Quickcards that our K-4 students use.  Since it gets heavy use, I print it out on card stock.  Note the settings I used.  I am printing here from Preview app.


When you load your paper in this side tray, an alert will pop up on the printer.   When printing with heavy paper, be sure to change the paper type to Heavy 1 paper.  Otherwise your printer be jammin' like Bob Marley.


Please consider where digital tools can replace or improve teaching and learning.  Send me a note if you would like to learn more.  Let's save a little of that paper.   


Tuesday, August 13, 2019

SeeSaw Best Practices


SeeSaw is a digital portfolio tool that is finding wide adoption in our elementary classrooms.

There are some best practices that I wanted to share about this tool:

1:1 Devices

Make sure that your class is set for a 1:1 device environment and NOT a 'Shared' environment.  This should be done when the class is created.  (IF you need to switch this, it will force your students to log out/log back in)


While you are in the Settings, you will need to decide whether or not you want students to be able to see each others' work.  This will be important, depending on whether or not your students will be in a collaborative environment.  Please check the other settings to see that they are where you want them to be.


Logging in:

In general, it is best practice for students to log into SeeSaw using their school Google account.  This allows students to very quickly switch between their different classes.  Students will remain logged in as long as they don't close out of SeeSaw.  This is preferred for grades 3-4.

When a student is primarily in a single classroom OR if little hands make logging in very tedious, then signing in with a QR code would be more appropriate. This is preferred for grades K-2.

IF a student is logged in via QR code in one class and Google for another class, then they are treated as two different students.  Parents would then also need to connect twice then, too.  (If we had the purchased version of SeeSaw, then these could be merged together.)


Parent Connections:

Parents can view their student's portfolio with the family SeeSaw App.  It is free on the Apple or Android stores for either smartphone or tablets.


Please either you or your students post at least one item to their journal before connecting any your parents.  When parents first connecting, they should be able to see something for student work.  As a teacher, you may share a post to all students as an Announcement, but it is much more meaningful if it is from their child.


It will be important to print out the parent invitation and send home with the students.  If a student has several posts without a parent connection, then please invite again.   As the teacher, you should be routinely providing constructive feedback for your students on their posts.  They enjoy having their audience see their work:  fellow students, teachers, and parents.

If you are just getting started, there are several model teachers that would be happy to show how they have been using this tool.

Pictures and Video:

Since this is a portfolio, it will provide a brief snapshot of the learning going on in the classroom.  In general, it is best to take pictures and video on the iPads with the Camera or Clips apps and then upload them to SeeSaw.  You can then select the best of your library.  You may also take pictures directly from SeeSaw, but you may have troubles using those resources in other places.

I appreciate your feedback.  Let me know if there are more details that you would add to this list.
Please let me know if you have any questions.

Thanks


Thursday, August 1, 2019

New Google Drive Feature 2019

A new feature was just added to your Google Drive that can help keep your work organized.  You may want to check this out ahead of the upcoming school year.

From Google Drive, you will notice a new option, labeled Priority.  From here, you can create a Workspace and include any combination of Google Drive items that you are working on, regardless of what folder they are in.

This is different than a Shared Drive, which is a souped-up shared Drive folder.  A Workspace is a private way to keep yourself organized and will be very useful for those tasks that include several documents.


You may also want to consider using Google Keep to 'keep' your world organized.

Some of you may use the Stickies app on your computer.  Google Keep is similar, but has many more features available, including the ability to share with others and convert to a Google Drive document.


Either of these items are also available for all student and staff Google accounts.  You will also see that these are available on your personal Google accounts, too.

Let me know if you have any questions.

Tuesday, July 2, 2019

Creating a Pages Template

It is very common for teachers to distribute templates to students for assignments.

A paper worksheet is a learning template, but it limits the content to what can be written with a pencil.  Digital templates create flexibility and allow students to demonstrate learning with a much greater depth of knowledge.

Take a picture and mark it up,  record a voiceover, add a video, add an animation, and more.  Let your students be collaborative and creative.


Pages can function like a traditional word processor.  Just keep typing and the text will flow onto the next screen.  This doesn't work well when we try to have a template created with multiple pages.  For that we actually want a 'page layout' format.  The structure is then built for students to add their different elements.

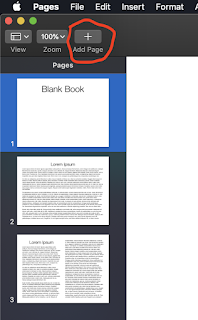
Here is a quick way to check to see if the template you are using will let you quickly add more pages for your learning template using Pages:


To use the Page Layout format in Pages, start here:


These directions are shown using MacOS (laptop).  It is best to do this before adding content to the document.
If your Pages document is set up as a word processor, 'Add Page' will be grayed out.  To add pages just keep typing more text OR insert two page breaks in a row.


We want to have better learning templates for students than a blank screen with text typed in.  That's not really a learning template.  It also does not support students very well who are still learning how to create multimedia rich products.  A blank screen does not support that very well.
In the upper right corner of your screen, click on Document.  Make sure Document Body is NOT selected when you want to use the Page Layout format.


Page Layout is nice when you want to use a template with fixed elements, such as a magazine or newsletter, where the text is all located in text boxes.  This is also easier when you want the option to be able to rearrange pages or add additional pages in the middle of a document.


To read more about this and other editing features in Pages, click on this link.

Monday, July 1, 2019

Timing Your Email

New to your Gmail account:

You can time when you want an email sent from your school or personal Gmail account.

At one time, I would regularly type up emails and leave them in my Drafts folder until I was ready to send, usually right away in the morning.  Often it was because I was doing my typing well after business hours.  

Pick the time/day/year that you would like to send....
     - a thoughtful birthday wish
     - an important meeting note
     - a note to a colleague about an upcoming event
     - you can even send an email to yourself, but delayed

Open a new Gmail message and enter at least one recipient.  Type up whatever you want to send out.
Click on the down arrow next to your Send button


Set the schedule as you wish.

Pick the time, day, and year.  Yes, you can choose the year.  It will work as long as your email account is active.  


This feature was only available through an email add-on.  That's not needed any more.
You can change your mind, too, and cancel that scheduled message at any time.  However, once it's sent, there's no bringing it back.  We can't unstrike that match.

Send me a note if there is a special feature that we should be highlighting for everyone to use.  I'll add it to my blog on another post.

Wednesday, June 12, 2019

ClassLink Auto-Fill for iPads

There is a new feature on the iPads that can help it work better with ClassLink.
You may get a pop-up message when you first open the ClassLink App.

Once ClassLink is installed on your iPad from Self Service, follow these two steps in your Settings:


Wednesday, May 29, 2019

Printing Double-Sided


Have you been trying to print a double-sided document, but the back side of the page is upside down?


Here is your fix:

When you select Print, drop down to the Printer Features section.  Change the binding from Long to Short.  It should fix the problem for items printed from your computer using Pages, Preview, Safari, etc.


See short screen video here:


and a screenshot here:


OR you can simply switch to single-sided printing:


Tuesday, May 21, 2019

Grinnell Tiger Logo Design Contest

A part of having awesome school spirit in our school district is in branding, which includes having our school logo visible.

Let's get creative and bling up the Grinnell Tiger Logo.

     There will be prizes for awesome entries.

Here is the original, which you may download.  You may also download a tiger with a black or white background from this Google Drive folder link.


Let's add a little bling to the logo using the Instant Alpha feature in Keynote on your iPad or MacBook.  Here are 2 examples that I created:

First, create a background.  Here, I just used simple images from the Shapes Gallery.  I used a variety of shapes, colors and sizes of the gear and put a rectangle behind it.  You will have better results if you try to completely fill the slide.

Next, drag and drop a Grinnell Tiger logo on top of your background. Select Instant Alpha.  Then click and drag slightly anywhere in the orange part of the picture.  Click Done to see how it comes out.  You can fine tune the picture as desired.


Here is my final product.  Let's see what you can come up with.


When you are finished, you may upload your image at this link.
I would like to give you credit for your work, so please include your name in your title.  
If you have troubles uploading it, just attach it in an email. I'll still take it.

K-2 Teachers:  I would recommend using Air Drop to send the original Tiger logo to your students OR create a Keynote template with a tiger logos already inserted on a slide.  

There is no deadline for this project.
The images will be a part of an electronic book that we will have published later this year.
Let me know if you have any questions or if you need a hand in class.
____________________________________________

Learning Extension:  Animated Gif


1. Duplicate the first slide (this gives you two identical slides). 
                On iPad, tap on the slide on the left side to bring up the Duplicate option
                On MacBook, 2-finger tap on the slide will bring up the Duplicate option
                A design note- your product will come out better if it fills the slide as much as possible

2. Go to Animate -> Build In -> Magic Move

3. On the second slide, click on each image.  
               Go to Format -> Arrange -> Rotate 
               Change the angle by at least 45 degrees or so. (Don't make the math hard.  You can just click on the up or down arrow beside 'Rotation' and give them a nice healthy turn.)  OR you can just move any of the pieces to new locations.  Magic Move will automatically build the transitions.
4. Click on the first slide.  Click on Play to check out your masterpiece.  If you like it, go on to step 5.

5.  On iPad, Tap on the ... in the upper right corner -> Export -> Animated Gif.  Make slides 1 and 2 are listed.  Adjust other settings to taste.    On MacBook, navigate to File -> Export to -> Animated Gif